
Table of Contents
- Step 1: Gather Safety Gear and Clear the Driveway
- Step 2: Match PSI, GPM, and Nozzle Tips to Your Driveway Material
- Step 3: How to Pretreat Concrete Before Pressure Washing
- Step 4: The Best Way to Remove Oil Stains From Concrete
- Step 5: Driveway Pressure Washing Technique: Surface Cleaner vs. Wand
- Driveway Pressure Washing Cost: What Homeowners Should Expect
- Troubleshooting, Runoff Management, and Maintenance After Driveway Pressure Washing
- Frequently Asked Questions
Last Updated: September 13, 2026
Step 1: Gather Safety Gear and Clear the Driveway
Driveway pressure washing starts with preparation, not the trigger. Skipping this step is how homeowners end up with etched concrete, cracked pavers, or a face full of atomized grime.
Before you pull the machine out, suit up. Water hitting concrete at 3,000 PSI throws debris back at you, and a stray pass across a crack can send chips flying (the CDC).
What you’ll need:
- Safety goggles that seal at the edges, not just sunglasses
- Chemical-resistant work gloves
- Rubber boots with grip
- Hearing protection if your unit runs above 85 decibels (osha.gov)
- Long pants and a long-sleeve shirt
Then clear the surface. Move vehicles, planters, toys, and mats. Sweep loose gravel and leaf litter first. A leaf blower or stiff broom removes grit that would otherwise ricochet off the pavement and scratch nearby siding.
Never point the wand at a person, pet, or electrical outlet. Even a brief pass at close range can break skin. Shut off power to outdoor outlets before you start.
Once the driveway is clear and you’re geared up, you’re ready to match your equipment to the surface.
Step 2: Match PSI, GPM, and Nozzle Tips to Your Driveway Material
The right pressure for driveway pressure washing depends on what the driveway is made of. Concrete handles more than asphalt, and asphalt handles more than pavers or stamped surfaces.
Two numbers govern your machine: PSI (pounds per square inch, the force) and GPM (gallons per minute, the flow). GPM actually does more cleaning work than PSI. High pressure with low flow just blasts a narrow strip; moderate pressure with strong flow lifts dirt across a wider area.
| Surface | Target PSI | Nozzle Tip | Notes |
|---|---|---|---|
| Poured concrete | 2,500-3,500 | 25° or 40° | Most forgiving surface |
| Asphalt | 1,500-2,000 | 40° | High pressure gouges it |
| Pavers | 1,200-1,800 | 40° | Can dislodge joint sand |
| Stamped or sealed concrete | 1,200-1,500 | 40° | Sealant strips easily |
Nozzle degree matters as much as PSI. A 0° tip concentrates the stream into a cutting point. A 25° tip is your general-purpose option. A 40° tip spreads the spray for delicate surfaces.
A common mistake is using a 0° tip to chase a stubborn stain. That’s how you etch a permanent line into concrete. Drop to a 25° tip, increase your distance, and let the detergent do the work instead.
Step 3: How to Pretreat Concrete Before Pressure Washing
Pretreating is how to pretreat concrete before pressure washing without wasting water or time. Detergent loosens organic growth and grime so the wand only has to rinse, not scrub.
Apply a cleaning solution across the whole slab and let it dwell. Most detergents need 5-10 minutes to break down mildew, algae, and embedded dirt. Don’t let it dry on the surface; mist it if it starts to evaporate.
For organic growth like mildew and algae, a bleach-based cleaner works well. For general grime, a surfactant-heavy detergent is enough. Match the chemical to the problem, not to habit.
Keep runoff out of storm drains. Most municipalities treat anything entering a storm drain as an illegal discharge, so divert water toward lawn or gravel where it can filter naturally (the EPA). Pre-wetting surrounding plants and covering them during application protects landscaping.
Step 4: The Best Way to Remove Oil Stains From Concrete
The best way to remove oil stains is to treat them before you wet the whole driveway. Oil and water don’t mix, and once the slab is soaked, degreaser can’t penetrate the stain.
Start with an absorbent. Cat litter, sawdust, or a commercial absorbent pulls up fresh oil. For older, set-in stains, apply a concrete degreaser and let it dwell longer than you would for general grime, often 15-20 minutes.
Then agitate with a stiff brush. This is the step most people skip, and it’s the one that matters most for oil. Scrubbing lifts the stain out of the pores so the pressure washer can carry it away.
For deep, old stains, a poultice can pull oil out over several hours. Expect some ghosting on very old stains; concrete is porous and oil migrates.
Step 5: Driveway Pressure Washing Technique: Surface Cleaner vs. Wand
For large flat driveways, a surface cleaner attachment beats a wand every time. It uses two rotating nozzles inside a shroud to clean in even passes with no zebra striping. The shroud contains the spray and the dirty water, which cuts overspray onto siding, fences, and parked cars.
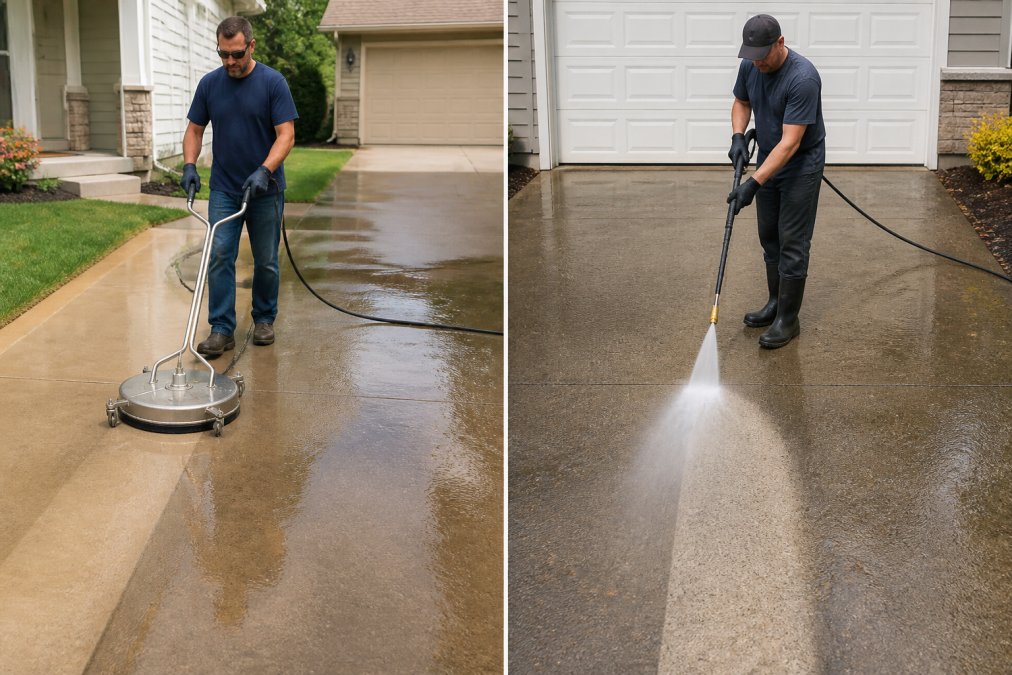
How a surface cleaner actually works. Two nozzles spin on a bar under a dome. Each nozzle is sized to the machine’s GPM, so the unit cleans a swath roughly as wide as the deck, typically 12 to 20 inches on homeowner models. Because the nozzles never stop moving, no single spot gets the full stream for long, which is why a surface cleaner is gentler on concrete than a wand held in one place.
Match the deck to the machine. A surface cleaner rated below your machine’s PSI and GPM will spin too slowly and leave swirl marks. One rated far above it will spin too fast and skip. Check the manufacturer’s PSI and GPM window before you buy.
Overlap and speed. Overlap each pass by about half the width of the cleaning swath. Walk at a steady pace, roughly one to two seconds per foot on a typical homeowner unit. Stopping in one spot etches the concrete; racing leaves stripes. If you see swirl marks, you’re moving too fast or the nozzles are worn.
A wand is the right tool for edges, steps, and tight spots the surface cleaner can’t reach. It’s also fine for small driveways where setup time isn’t worth it. On a wand, hold the tip at a consistent 45-degree angle and keep it moving. Work from the top of a slope toward the bottom so dirty water runs away from what you’ve already cleaned.
Edges and transitions. Run the surface cleaner over the open slab first, then finish the perimeter, expansion joints, and the apron at the street with the wand. This order keeps you from tracking dirty water back across clean concrete.
Watch the joint sand on pavers. A surface cleaner on pavers can blast out the polymeric sand between units. On pavers, drop to the low end of the PSI range, keep the deck moving, and plan to re-sand the joints after the surface dries.
Run a test pass in an inconspicuous corner before you commit to the whole slab. Ten seconds tells you whether your PSI, tip, and speed are right for that surface.
Finish with a full rinse at low pressure to flush loosened dirt and detergent residue toward the lawn or gravel, not the street.
Driveway Pressure Washing Cost: What Homeowners Should Expect
Pressure washing driveway cost varies widely, and no single number fits every property. Pricing depends on square footage, surface condition, stain severity, accessibility, and whether the job includes sealing or post-treatment.
A few things genuinely move the price:
- Driveway size, measured in square feet
- Type of surface and how delicate it is
- Severity of staining, especially oil and rust
- Whether you need a follow-up treatment like sealing
- Add-ons such as sidewalks, patios, or house washing
For an accurate figure, request a written estimate. At Carters Precision Pressure Washing, we provide free estimates so you know the scope before anyone shows up. Call for a free estimate and get a number tied to your actual driveway.
Troubleshooting, Runoff Management, and Maintenance After Driveway Pressure Washing
Most guides stop when the water dries. The three things that decide whether the job holds up are what you do when something goes wrong, where the water goes, and how you care for the surface afterward.
Troubleshooting what went wrong
Zebra striping. Alternating clean and dirty bands mean your passes weren’t overlapped enough. Re-wash the striped area with a 50 percent overlap and a steady walking pace.
Etch marks or wand lines. A bright, chalky line means the wand sat too close or you used a 0-degree tip. Etching is a physical removal of the concrete surface, so it won’t wash out. On light etching, a 25-degree tip at a greater distance and a slower pass can blend the edge. On deep etching, the fix is a topical resurfacer, not more pressure.
Swirl marks from a surface cleaner. Usually worn nozzles, a deck rated below your machine, or walking too fast. Replace the nozzles, check the rating, and slow down.
A stain that won’t lift. Almost always a dwell or agitation problem, not a pressure problem. Re-apply degreaser, let it sit the full dwell time, agitate with a stiff brush, then rinse. Adding pressure to a stubborn stain is how you etch the slab.
White haze after drying. Often detergent residue or efflorescence. A low-pressure rinse with clean water usually clears detergent residue; efflorescence may need a dedicated remover.
Runoff management
Never let wash water run straight into a storm drain. In most jurisdictions, anything entering a storm drain is treated as an illegal discharge because storm drains typically flow untreated to local waterways. Divert water to grass, gravel, or a landscaped area where it can filter naturally, and use a boom or berm if your driveway slopes toward the street. Check your local rules before you start; requirements vary by municipality.
Pre-wet surrounding plants before you begin and cover them during application. Rinse them again afterward. Bleach-based cleaners and degreasers can burn foliage, and the damage often shows up days later.
Maintenance schedule
A driveway doesn’t need washing every month. A seasonal cadence keeps it looking clean without over-working the surface:
- Spring: Full wash to clear winter grime, road salt residue, and organic growth.
- Summer: Spot-treat oil and rust as they appear; a full wash only if needed.
- Fall: Clear leaf litter and debris before it stains; wash before the first freeze.
- Winter: Rinse salt and de-icer residue when temperatures allow; avoid washing when the surface is near or below freezing.
Let the driveway dry completely, typically 24 hours, before sealing. Reseal every 2-3 years, and reapply sooner if water stops beading. Clear debris regularly and treat new oil spots immediately; the longer oil sits, the deeper it sets.
The single biggest driver of long-term results isn’t the PSI. It’s what you do after the wash: sealing, quick stain response, and regular debris removal.
Frequently Asked Questions
What should I pretreat my driveway with before pressure washing?
Apply a concrete-safe degreaser to oil spots and a diluted bleach solution to mildew or algae, letting it dwell 10-15 minutes before scrubbing. For how to pretreat concrete before pressure washing, start with a pump sprayer for even coverage, keep the surface wet so chemicals don’t dry, and rinse thoroughly before the main wash. This pre-treatment loosens grime so your driveway pressure washing pass removes it in one sweep instead of three.
How much does it cost to pressure wash a 2,000 sq ft driveway?
Pressure washing driveway cost depends on square footage, stain severity, and whether sealing is included. Professional quotes factor in travel, detergent, and runoff management. For an accurate number on your property, call for a free estimate rather than relying on national averages.
What is the best way to power wash a driveway without damaging concrete?
Use a surface cleaner attachment instead of a wand, cap pressure at 3,000 PSI for standard concrete, and keep the nozzle 12-18 inches from the surface. Use a 25-degree fan spray for edges and a 40-degree tip for pavers or asphalt. Work in overlapping passes at a consistent speed, and never hold the wand still in one spot, which causes etching. For older or cracked concrete, drop to 2,500 PSI and repair cracks before driveway pressure washing.
How do I safely remove oil stains from a concrete driveway?
The best way to remove oil stains is to act fast: blot fresh oil with cat litter, then apply a concrete degreaser or a baking soda and dish soap paste. Let it sit 15-30 minutes, scrub with a stiff brush, and rinse. For set-in stains, repeat the process or use a poultice of trisodium phosphate. Pressure washing alone pushes oil deeper, so always pretreat before driveway pressure washing. Severe stains may need a professional enzyme cleaner.